Audacity is one of those applications that make people amazed at the generosity and power of Open Source. Everytime I show this app, they cannot believe that this is available for free. Audacity allows you to record, edit, export sound all in one easy interface. You can download it from the Audacity website. It will work on pretty much every Operating System you can imagine.
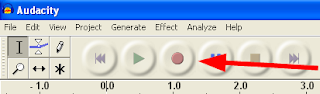 Once you have it downloaded, do a test run to make sure all of your sound settings are correct. To do this click on the big red button in the upper left.
Talk into your microphone and you should see sound waves appear on the screen below it. If you don't see this: 1) Make sure you are talking loud enough, 2) Check your sound settings (Windows: Click on Start, Control Panel, Sound and Audio Devices, the Audio tab at the top, and finally under sound recording click Volume and make sure it is turned up)
You may already have a microphone built into your computer which is perfect for podcasting and basic recording. If you are really in a pinch, take your earbuds (like those for your iPod), plug them into the microphone slot and you have a makeshift microphone. Speakers and Microphones are pretty much the same thing just in reverse.
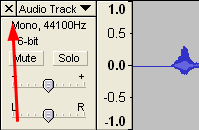
To playback push the Green Play button. The red line will show you where you are in the recording.
Once you are done with your test, you can delete the test by clicking on the
X on the track you just recorded.
Editing Your Track:
Let's say you are recording your speech or music and you make a mistake. Just keep going because you will edit it out later with ease. If you can edit a document you can edit audio in Audacity. After your recording is finished, use the sliders at the bottom of the screen to move it to the approximate time. The click and drag your cursor to highlight the area you would like to remove (if you are unsure if you are in the correct spot, click play and Audacity will only play the highlighted area). To remove the selection, click Backspace or Delete and your selection will be deleted and shift everything up. Couldn't be easier right?
You can do the same thing to copy and paste a selection, to repeat a sound over and over. A lot more settings can be found in the aptly named Edit menu at the upper left just as if you were editing a document.
You may find it useful from time to time to get a very specific part of your recording. Click on the magnifying glass under the menu bar.
Move the mouse over the area to magnify, left click to zoom in and right click to zoom out. Click on the selection tool right above the magnifying glass to return to the ability to highlight and edit.
Saving and Exporting your Files:
Audacity is easy for recording and editing, but it is just as easy to create files for sharing your music or sound with the world.
Save Project for later:If you are not finished with your work just yet, you should save it as a project so you can come back to it later. Click File and Save Project. It will prompt you to save and then create an Audacity Project File (.AUP) and a Data folder. Do not separate the Project File and the Data folder or you will not be able to reopen your files.
Export WAV: A standard file that can be played on any computer. It tends to be a larger file than if you made an MP3. Click File then Export as WAV, you will be prompted to save and then Audacity will create your file.
Export MP3: One of the most widely recognized and playable sound file types in the world, you will most likely want to export your file as an MP3 as it is playable on mobile devices and is smaller than a WAV file. To export your sound as an MP3 you will need an additional free plugin. To download it, click on the following link,
LAME MP3 Encoder. Once installed, you can click on File and then Export as MP3 in Audacity.
NOTE: Audacity is using a large amount of memory to create your file. If you notice that Audacity is running slow or crashing often, close other programs and make sure you are not sharing to a networked drive. At our school, our students had a networked "My Documents" folder that it would default to saving to. This would slow down the entire network and crash Audacity. This is not a problem for those of you who are saving to your hard disk.
I hope you will find many uses for this powerful software. If you have any questions, send me an email or leave a comment. In the follow up post, I will review some of the ways you can use this software for music, podcasting, Physics, and more! Stay tuned.