Something Amazing is Happening, Join Us in Redefining Learning!

The world we have created is a product of our thinking; it cannot be changed without changing our thinking.  -Albert Einstein

An excellent YouTube video called Rip Van Winkle goes to School powerfully drives home the point of how similar our classrooms are to their one-hundred year old counterparts. Even with all of the technology that we have in our classrooms, they still produce the same results (or lack of them).

Why have we not seen the technological revolution inside the classroom that we have seen in our society? It seems like we have adopted the technology to our old ways of doing things instead of letting the technology transform education and learning.

Case in point, there are an incredible number of online videos that universities have made available to everyone. The problem is that they are lectures and many of them are about topics that we would not watch unless we needed to. I am not saying that they are not interesting lectures but if I want to learn something, I am not going to sit through a semester's worth of videos, I'll get a book.

The New Library
There is an anecdote about Richard Feynman, the noble prize winning physicist, where as a teenager he is discussing with college students about a particular Calculus term. He mispronounces the name of it because he learned it from a book and they give him a hard time. He retorts how wasteful their education is if they spend an entire semester to learn what he was able to learn in the library in an afternoon.

I love libraries and always have. Before the Internet, I spent many days sitting there and enjoying a book and absorbing information. There was no pacing guide, no test at the end, and if I wanted to read an "adult" level book there were no prerequisites.

A community library was a relatively new concept, once reserved only for the elite. It grew in importance to society and the access to information became more and more necessary. Suddenly there was a push for literacy as a human right because it was going to determine what one's opportunities were. Knowledge was power.

However, we took this ideal to the extreme. We created an educational system that ruined the best parts of a library. What makes a library incorruptibly good is that it is voluntary and self-guided. We became obsessed with learning information and as the information increased, so did our standards. When one leaves our classrooms, what are they equipped to do? The answer is not a whole lot.

I hear and forget. I see and I remember. I do and I understand. - Confucius


Patrick and I wrote about a place called the Hub of Learning which was intended to provide the same freedom and opportunities as a library. Yet, we quickly found out that creating a school, even one with the best of intentions is difficult.

There are some schools who provide a highly personalized learning path like the School of One or a self guided curriculum like the Met School, but each of these have their drawbacks and limitations as they are still expected to do well on state standardized tests. It's as one official put it, a "false sense of freedom".

Yet all over, there are these learning opportunities emerging that are completely free from the restraints of the system. The Khan Academy allows students to learn at their own pace as much as they want for no cost.  Instructables and Make provide a community encouraging hands on learning and DIY. The Hacker Spaces provide a physical place of learning and TechShop provides all of the resources and knowledge that you need.

Is it impossible to conceive of a student who wants to become a molecular biologist and decides to embark on her journey at a young age? What could a student who was filled with intrinsic motivation and resources accomplish? Much like the tech revolution that began in the garages of Steve Wozniak and Bill Gates, people are analyzing the very fundamentals of life. These Life Hackers are defying all paradigms of learning by not waiting until graduate school to make discoveries worth one's time.

This is not unique to Biology, there are Rocket Scientists, Programmers, Poets/Writers/Graphic Novelists publishing their own work, filmmakers armed only with laptops, and the list goes on.

We could say that this is a new movement but it is not. We are just seeing more of it now because of our ability to share information quickly and the ubiquity of low cost technology. It is those two components that primarily fuel my vision for what learning will look like. However, in my opinion there is one more piece to the puzzle that is needed and that is community.

We are highly social beings but our online connectivity has not necessarily translated into increased community interaction. I am able to collaborate and enjoy myself with people around the world, but I honestly do not know any of my neighbors.

Imagine all of the resources that exist online. All of the information we can imagine is available to us instantly. Yet, without the ability to make a tangible difference in our community or lives it is worthless. I have already spoken about the power of online crowdsourcing and how powerful we are when we combine our efforts, this cognitive surplus is now our greatest resource.

This is a way of living that worked for thousands of years very successfully and now we have the ability to work in both a global community and also a local one. We must participate in both as the global community only thrives when the individual ones do as well. Many of our communities need help and it is we who need to stand up and do it.

How can we do this? I propose a new kind of library dedicated not just for information but for doing. The Internet reflects our love for information, but Web 2.0+ recognizes our need for doing and creating. Learning is already taking place online but it lacks a physical space to manifest and make. The desktop printer allowed for many to publish who had never before. Technology is available now that one can create almost anything from music to robots to movies to medicines.

This place of creating would have resources available for creation and to support those who want to learn. This would encourage job growth, innovation, and economic stimulus. It would give us a reason to learn beyond just knowing for a test. Workshops and exhibitions could be coordinated through meetups large and small. Discoveries and learning would happen far faster than any textbook or curriculum ever could.

The great strides that we made as a society came from the increasing availability of  information that started with communities, increased with Libraries, and found its peak in the Internet. In order to transition to a more sustainable and healthy society, we require not a linear increase of more of the same, but a quantum leap that begins as it always has with community. This time we combine knowledge with creation.

This has to be parallel and independent. It cannot be allowed to become a system for then it will lose its power. It must be a movement not a program. A great leap of faith was made with libraries in order to allow them to be independent and free. I ask for a similar trust to placed in the evolution from simply knowing to doing and creating. Our students need a place to go where they can explore and discover passions and interests as freely as one peruses the bookshelves. They need guides and mentors who can help them become masters. Only with motivation and resources can we hope to see innovation. Remember what you learned and gained by walking the hallowed shelves of the library, let us give to the next generation an equally powerful and meaningful gift.

What would transform our culture?

Here are my 4 suggestions for transforming our culture into what we say we want it to be:
  1. Fund after school programs to help provide open and enriching opportunities to students. I believe that Robotics is the best way to teach students about math, science. and technology; but programs that support the humanities are equally important.
  2. Support technology that removes barriers to innovation. Makerbot is saving lives in 3rd world countries, Khan Academy is providing anyone with a deep understanding of Math (see a video about Sal's vision for the future of math class). I also appreciate software like Autodesk who provide their incredible design software for free to Robotics students.
  3. Create the 21st century Library that involves doing and creating. Providing mentoring and classes where the local community can teach, learn, support, and connect. Make them everywhere so that all students of all ages could participate.
  4. Encourage community activities that celebrate creativity and learning. It would be an exciting world where events like Odyssey of the Mind, Robotics Competitions, Maker Faire were so ubiquitous that thinking, making, learning, and creating were everyday activities.

This weekend, "Waiting for Superman" was at my door. As my Robotics team worked, our school held Informational sessions about our school and how to apply and be admitted via the random lottery. Students aged 5-15 came to my classroom and their eyes were huge with the possibility that they could come to a place where they could do cool things like this. One little girl maybe 10 years old, bless her heart said, "Wow Dad, now I REALLY want to go here."

It is sad that only a small portion of the population experiences an empowering eduction either because of situation, location, or the system in general. There are great schools out there but far too few of our citizens are going there and being mentored to be leaders and innovators.

If we create a culture of learning that lives and thrives outside of school and does not end when one receives their diploma, then we will see dramatic transformation in our society in every realm. That is a bold statement but I stand behind it.

These four things will transform our culture in ways we cannot even imagine. Anyone willing to partner with me in implementing them? I am well on my way, but changing a culture requires many people to be on board.

Subscribe to BrokenAirplane!

FRC Team Chaos Vortex Week 3 Update

I breathed a huge sigh of relief on Tuesday when our programmer got the wheels to turn via the joystick. Pretty pleased with him considering it is our rookie year and he is only a Sophomore. He is working with Labview and seems to be picking it up quickly. There is also some headway with the image processing and getting the Camera to be able to understand and track what it sees. I am crossing my fingers on that one but would be elated to see him figure it out.

Another sigh of relief came when McMaster Carr delivered our back-ordered part on Thursday. We had been waiting for a week only to find out that the part was much heavier than we expected (there was no mention of weight nor density on the site) so we are on to Plan B which involves only some minor adjustments. Ah the fun of FRC.

The students were treated to a tour of SPAWAR on Tuesday and were amazed at all of the things they were doing with robots. They also remarked how much they recognized from working with FRC! Thanks Dean Kamen for providing these students with an amazing real world opportunity. One of my students says she is reconsidering where she goes to college simply so she can apply for an internship at SPAWAR.

Southwestern College is lending their support to our team and we are grateful to them, a couple of more companies said they would get back to us soon and then we can make our t-shirt and banner. We gained a couple more students from opposite ends of the spectrum: A senior who just this semester realized how much he likes programming (thanks for inspiring him Allison of Infinigons), and a young student who participated in our summer academy for incoming high schoolers are taking over the MiniBot design and it looks pretty exciting.

This is definitely the middle of the build season as things are moving along and the ship date is approaching fast. I have imposed a deadline on them of February 7th (when it actually ships on the 22nd) so we have time to work out the kinks and practice. I made sure this happens by planning two exhibitions, one for an elementary school and the other for our own Parent Association. I would rather have an amazing driver and a well tested (but perhaps simpler) robot than a unpracticed driver on a robot with everything untested.

FRC is definitely turning out to be as exciting and fulfilling as I remembered it to be. I look forward to seeing the students wrap everything together and being able to call this thing a robot!

Subscribe to BrokenAirplane!

How to Learn a new Programming Language with Students

Over the last half century, technology and electronics have become more and more complex and what they are capable of doing is simply phenomenal. Yet, for many students of science, the most instruction they receive in Electronics is the lighting of a light bulb or the turning of the motor. It is weird to me that we place electronics at the back of textbooks and curriculum preventing most educators from ever getting to it.

This is an incredible nexus in our history. The technology is amazing, but equally amazing is that the tools to create technology is within your students reach. Never before have their been so many free and relatively easy ways to learn a Programming Language (examples: Python, Google App Inventor, and Processing). Even the hardware is becoming cheaper with the Arduino, OLPC, and Makerbot. The point is that your students can create far more than ever before, and much of it with tools freely or cheaply attainable.

The question is how does one learn a programming language? I have had many discussions with our Spanish Teacher/Linguist on campus and it is clear to me that learning a programming language has some characteristics of learning a spoken language and many differences.

The essentials of learning a programming language
  • Motivation: The students must have an interesting goal or project. This process often requires high level abstract thinking and if they are not into it they will simply shut down. I often will have a demonstration or example of what we are going to do, or an interesting question that is best solved by a program. One example of this is how do you add up the numbers from 1-1000? (Yes I know of the Gauss method, but they often do not)
  • Access to resources. This means online videos, web based tutorials, forums, etc.
The combination of motivation + tutorials is what makes it possible to learn anything. If you have one without the other you are either going to drag them kicking and screaming or get wildly frustrated.

Developing Algorithms
Languages come and go but good algorithms last forever. I would rather they learn to transform a concept into an algorithm than become experts in any particular language. The way I frame this is by presenting a problem (e.g. generate Fibonacci numbers, primes, add two fractions with dissimilar denominators, etc) then asking them to explain it as if it were to a 3rd grader. 

This helps them break down the steps into very specific instructions. I will sometimes play the role of the child who misunderstands a seemingly simple command so they can refine it. Some might suggest using Pseudocode, I simply write it in English shorthand to make it as understandable as possible to the neophytes.

The trick is then helping them translate that to the language. I would not start with the above examples. First start with the Hello World exercises until they are able to get more complex and handle control structures (e.g. if-then-else statements) and looping.

Learning Syntax
Most often in programming languages and spoken languages, the difficulty is not in knowing what to say, but how to say it. When my students are learning a language, I will create or use one of the handy reference sheets found by Googling _________ reference sheet (fill in name of language). The Processing Language has a great reference sheet. Just make sure you adapt it to their needs so they are not overwhelmed. Here is one I made for Python Turtle.


If you really want to get programming with your students, the quickest way to get off and running is to go to the bookstore or go on Amazon and check out a book on programming that suits your needs. Don't be put off by the "dummies guides", I cannot tell you how much I have learned from them and they sit proudly on my bookshelf next to the other more technical books I was able to read afterwards.

Check out the exercises at the back of each chapter and feel free to use these in the classroom, like playing a musical instrument or writing in a journal, these exercises will challenge their minds and stretch their brains. You are doing a service to us all by helping spark an interest and I thank you!

Subscribe to BrokenAirplane!


Challenges of Engineering Project

Even with all of the resources I have for planning projects, sometimes the best ones come from just being in the right place at the right time. A couple of months ago, I took some students to the first National Science Fair in Washington DC and we had a great time seeing all of the universities and organizations who had shown up to renew the country's commitment to STEM.

One of my favorite exhibitions was with Disney/Imagineering and the National Institutes of Health. They were partnered to demonstrate innovation in one of the critical Challenges of Engineering that were produced by the National Academies of Engineering. Some examples are cyber security, solar energy, personalized learning, and 11 more.

When I came home, my humanities teaching partner mentioned to me that she would like to work on the technical writing skills of our students. An idea for a project was born and after some collaborating, we had decided that we would have the students create research paper/posters based upon the Challenges of Engineering.

This was a valuable project for many reasons:

  • It did help the students learn about these important topics that threaten the survival of our society as we know it. Students began with almost no knowledge of these topics and yet at the exhibition were able to impress community members we had invited with the depth and breadth of their knowledge.
  • Students worked diligently to research these topics using college level resources and understand it in a way that they could explain it to others.
  • This provided them an opportunity to create beautiful work through feedback and refinement.
  • We set a high standard of excellence, our model and criteria were based upon the same used for Graduate School work, but the students rose to meet our expectations. 
If you would like to see the finished posters the students made click here for the link.
The instructions, template, etc can be found here.

FRC Team Chaos Vortex Week 2 Update

We are near the end of the second week of FRC (FIRST Robotics Competition) and already we are feeling every emotion possible. Yet overall there is a ton of energy and excitement in the class. I am really proud of my Rookie Team - 3477 Chaos Vortex as they have worked together and earlier this week finished refining their design.

I am sure they wanted to start building right away, but the more time you take to plan, the less time you spend fixing it to make it work. So I really got on them about how parts would fit together and detailed measurements. The parts list grew more and more and as I placed our first order of $2000 I felt confident that they were well on their way to success.

Being a small team, we have most of our team focusing on building, with only two figuring out  the programing code and electrical components. They have done an incredible job and I am grateful to Allison of Infinigons and her boyfriend for being there to support them. This was Allison's first major encounter with Robotics and her programming background has been solely with software. So when they figured out how to make the motor turn via the Labview Software, her eyes lit of with amazement. I love Robotics because it provides opportunities for students of all ages to experience something wonderful like that.

Later this week we had Richard from the National City Plaza Bonita JC Penny come to bring pizza and meet the team. In addition to receiving the NASA Grant, they are our primary sponsors. We are so grateful to them, without their support we would not have a team this year. Richard is really interested in our team and school and has a strong passion for community service which he strives to instill in his store employees. He asked a lot of great questions and was amazed at how the students work together. He was most impressed with how he and I could talk for two hours, and yet the team did not need me to know what to do.

This doesn't mean that I am unnecessary to the team, I give feedback and guidance where I can but I do not design or build the robot. Robotics allows students to see the power and potential of what they are capable of and the less I do, the better. They do a marvelous job of managing themselves. Case in point, we had moved forward with a C-Shaped drivetrain because we felt it would be the easiest way to pick up the tubes (watch the game animation) but later that night, the students discovered that this was not allowed by the rules. Rather than freaking out and getting angry or giving up, they talked it out and within 10 minutes or so, were ready to proceed full steam ahead. 

I would encourage all teams to take a second look at the Robot section of the rule book because there are a lot of things that have changed over the last couple of years. We read the manual very diligently and still managed to miss it. Thank goodness for the Chief Delphi Support Forum!
There was Richard, myself and a team mentor in the room when this incident happened and we were all so impressed and proud of the team and how they listened to each other and worked it out with Gracious Professionalism. I am sure it had helped that this team has spent 3 years as a VEX robotics team developing strong bonds and respect for each other.

I cannot wait to see what is in store this week. The robot is starting to come together along with the code and mechanisms. Our FTC Minibot kit came yesterday (thanks to FIRST Choice for providing that to us) and while I am still tired, I am loving every single minute.

How is your team doing? Are you following this blog and wondering how to start your own robotics team? Let us know what we can do to help.

Subscribe to BrokenAirplane!

The Mysteries of Math: Fibonacci and Golden Ratio

I wanted to share out a really fun activity that you could make into as quick or as lengthy an activity or project as you would like. It incorporates two of what I like to call, the "mysteries of math", the Fibonacci Sequence and the Golden Ratio.

For those of you unaware, the Fibonacci sequence is generated by the rule of adding the two previous numbers in order to obtain the third and so on. The most famous version of this sequence is generated when you start with the numbers 1 and 1

The golden ratio (also known by the Greek letter phi)  is the irrational and transcendental number which is approximately 1.6180339887. One of the ways of obtaining the golden ratio is by dividing the larger number by the smaller number in the Fibonacci sequence (e.g. 5/3 = 1.66666, 13/8 = 1.625, 21/13 = 1.61538, etc). In calculus language, one would say that the limit as the number of terms in the Fibonacci sequence approaches infinity, the ratio approaches phi.

So before I talked with the students about the Fibonacci sequence or the Golden Ratio, we did a measurement activity where the students measure various parts of their bodies and calculate the ratio of the larger to the smaller. After completing this, they individually submitted their data to this Google Form (if you are not using this amazing and free technology in your science and math class, learn how at the Google Form Tutorial page)

I should mention that I was inspired to do this activity after reading this great post at the Republic of Math blog.

When we looked at the data we examined their average class data and individual data and realized how similar it was. We had a conversation about the Golden Ratio and I showed them this YouTube video describing where the Golden Ratio can be found in nature and in our world.

Just as I had hoped, one of the students asked, "Well why doesn't our data match up exactly with the Golden Ratio?"Some students predicted that it was because of measurement error. Another student had a great idea that perhaps since they are teenagers who are still growing, perhaps it throws off the ratio.

I love days like this, where I can have great conversations about the nature of science and math. Random topics pop up in these discussions like Pascal's Triangle and how many sides and/or vertices does a circle have.

I asked them if they could think of a python program that could come up with all of the Fibonacci numbers and Golden Ratio that they wanted. Since they had not written a program by themselves yet they were initially stumped, but next week I will show you the conversation that eventually led to their algorithm and program.


Subscribe to BrokenAirplane!

Why I love my Android OS Smartphone

It is no secret that I love Google. Everything they make is so well integrated and well designed (ok Buzz and Wave had promise but oh well). I even helped test out Google Apps for our school and knew that it was going to be far more useful than Outlook for coordinating our meetings and working with our students.

So when the time came for a new phone, I knew I was going to go for an Android phone. I knew I would enjoy the email and calendar integration and maybe even a few apps but I had no idea how much I would enjoy it. When I first got my Android phone I was blown away by its potential. I kept remarking that this was the first phone that actually felt like a "smart phone" or a phone from the future.

Why I am writing this post, almost 2 years after I first got an Android phone? Well, our school provides our parent and students comments bi-annually. As fulfilling and enriching as this is for them, it is extremely time consuming to write 75 or so comments (especially when I have the FRC season underway). 

A couple of semesters ago, I realized that I could write comments while I was sitting in a line bored or riding shotgun up to Los Angeles to visit family. This has significantly reduced the strain and stress of doing comments and has prevented me from having to experience the hours of last minute comment writing that my comments.

Yesterday, I was writing a comment and needed to check the student's grade. I was able to switch back and forth between the gradebook website and my Gmail where I was writing my comments. It struck me just how Android allows me to be powerfully mobile.

How else do I enjoy my Android phone? Many probably misunderstand us smart phone users and think we are just Facebooking or Tweeting all day long (and some may be). Yet, I have become much more productive and efficient since having my phone and it has allowed me to maintain this blog, keep my FRC team, communicate with students and parents

Some of my favorite Android apps for Education and features are:
  • Dropbox: Having a networked drive that is easily accessible from the net is invaluable to a teacher. I cannot express how much I love backups of my stuff and the Android app is so wonderful with the ability to read and view almost any file.
  • Editing Google Docs: Really useful to be able to modify and collaborate on a document without being at a computer (Android 2.2 only)
  • Gmail and Google Calendar is so wonderful on an Android phone. Some write things down to remember them, I write them down to forget. Whether it is an idea or an event, I put it into my phone so I can spend my time and effort thinking about other things and being creative. With the updated Gmail app it is even easier for me to do these things. As a project based learning educator, I am always thinking of new ways to help students understand and apply information, and with my phone, I just send myself a little quick email (even at 2am) and no need to fret and concern myself with it anymore.
  • Rooting: Although I haven't yet done this for my Android 2.2 phone, rooting my HTC Hero made it much more enjoyable. The boost in speed was definitely worth it.
  • Tasker: My favorite Android app (next to Dropbox). It has a learning curve, but the Tasker wiki has some great tutorials. It allows you to customize your phone to your life and have it turn off the ringer at a certain time of the day or at School (based on GPS). There are countless other options to suit every possible need. While I still strongly support Free and Open Source, this app is definitely worth its price.
  • Versatility: The phone is basically open, which allows it to be used as my 8GB hard drive, mobile hotspot, robot remote control, and so much more.
For more apps, I suggest you check out the updated Best Android Apps for Educators and anyone else who wants to be incredibly productive.

While some might think that constant communication and access to information would be overwhelming and a drain on time, I have actually found the reverse. Of course out of the box, the phone has all of these notifications and reminders but I suggest you turn these off to suit your life. 

The fact is that, I enjoy the ability to get information, make reservations at a restaurant, communicate with my PLN and friends, get directions, and so much more. If you can get an Android phone I highly recommend it. My family uses Sprint because of the unlimited Data plan but there are many great plans out there. Let me know if you have any questions or suggestions on how to use Android to be more productive.

Subscribe to BrokenAirplane!

Modeling Math with Python Programming: The Spirograph Program

Hopefully this software does not remind you of the intense amount of snow some of you are getting. I am often inspired by others to create software and when I was browsing the Math.com site one day, I found a beautiful Spirograph applet that I knew I had to try to recreate in Python. I try to impart this to my students, seeing something that you don't initially understand and learning as you go.

It required me to relearn Parametric Equations, refine my knowledge of Class Objects, learn the controlls functions in VPython and push the boundaries of my computer's memory.

In order to run this code you will need:
Python 2.6 - The interpreter for the code. Check out the programming page if you would like to know more about implementing Python or programming in your classroom.
VPython - The visual add on for Python.
Psyco - Speeds up the code significantly so I could run it on older laptops. If you don't want it or need it, feel free to delete the first couple of lines (before the "from visual")

Enjoy the pictures and the code below, and please share any great code you have or suggestions.


Spirograph Maker inspired by http://www.math.com/students/wonders/spirographs.html

1
 2
 3
 4
 5
 6
 7
 8
 9
10
11
12
13
14
15
16
17
18
19
20
21
22
23
24
25
26
27
28
29
30
31
32
33
34
35
36
37
38
39
40
41
42
43
44
45
46
47
48
49
50
import psyco
psyco.full()
from visual import arange,curve,color,cos,sin,display,rate
from visual.controls import controls, slider,label

iterations = input('How many iterations?')

class spiro():
    def __init__(self,iterations):
        self.R = 65.0 #Radius of Fixed Circle
        self.r = 43.0 #Radius of Moving Circle
        self.o = 75.0 #offset of pen point in moving circle
        self.t = arange(0,iterations,1)
        self.drawing = curve(x = ((self.R+self.r)*cos(self.t) - (self.r+self.o)*cos(((self.R+self.r)/self.r)*self.t)), y = ((self.R+self.r)*sin(self.t) - (self.r+self.o)*sin(((self.R+self.r)/self.r)*self.t)), color = color.green)
    def fixedRadius(self,fRadius):
        self.R = fRadius.value
        self.redraw()
    def rollingRadius(self,rRadius):
        self.r = rRadius.value
        self.redraw()
    def penOffset(self,pOffset):
        self.o = pOffset.value
        self.redraw()
    def redraw(self):
        self.drawing.x = ((self.R+self.r)*cos(self.t) - (self.r+self.o)*cos(((self.R+self.r)/self.r)*self.t))
        self.drawing.y = ((self.R+self.r)*sin(self.t) - (self.r+self.o)*sin(((self.R+self.r)/self.r)*self.t))

class GUI():
    def __init__(self):
        self.c = controls(x=0,y=0,width=400, height = 400, range=100)
        self.s1 = slider(pos=(0,40),width=7, length=40, axis=(1,0,0),min=1,max=100,action=lambda:
                         Spirograph.fixedRadius(self.s1))
        self.s2 = slider(pos=(0,0),width=7, length=40, axis=(1,0,0),min=1,max=100,action=lambda:
                         Spirograph.rollingRadius(self.s2))
        self.s3 = slider(pos=(0,-40),width=7, length=40, axis=(1,0,0),min=1,max=100,action=lambda:
                         Spirograph.penOffset(self.s3))
        self.fixedRadiusLabel = label(pos=self.s1.pos, display = self.c.display, text='Fixed Radius', line = 0,
                                 xoffset=0, yoffset=20, height=10, border=0)
        self.rollingRadiusLabel = label(pos=self.s2.pos, display = self.c.display, text='Rolling Radius', line = 0,
                                   xoffset=0, yoffset=20, height=10, border=0)
        self.penOffsetLabel = label(pos=self.s3.pos, display = self.c.display, text='Pre-Offset', line = 0,
                               xoffset=0, yoffset=20, height=10, border=0)
        self.scene1 = display(title = 'Spirograph!', x=410, y=0, width=400, height = 400)
        self.scene1.select()

WYSIWYG = GUI()
Spirograph = spiro(iterations)

while(1):
    WYSIWYG.c.interact()


Subscribe to BrokenAirplane!

Presentations of Learning Keep Us All Informed and Accountable

Twice a year, we take a break from our normal curriculum and classroom schedule in order to have Presentations of Learning (POLs). This is a week long event in which every student shares with their classmates, teachers, family, and community members what they have learned over the last semester.

The word "learn" always needs clarification for the students and so I am sure it is important to define it here. When we are referring to learning, we are not necessarily referring to "book smarts" or testable learning (although sometimes that is requested as well). Many of us focus the conversations around the Habits of the Heart and Mind but others use other similar themes or essential questions.

We ask the students to reflect and present upon the previous semester and to describe the challenges they have experiences and the growth that they have seen in themselves. They can provide evidence through project artifacts, their Digital Portfolio, anecdotally, or other various means of convincing us that they have used their time well this semester.

Remember, this is not a focus on things we have already graded them on because that would be a waste of time. I have other ways of assessing that. This is a chance to have a conversation with them and realign my perspective and goals with theirs. It is so rare that we have the time to get a student's perspective and I consider this a critical part of heading into the second semester.

The presentations last for about 10 minutes with a few minutes for question and answer afterwards. If we do not feel that the presenting skills meet our criteria or that the reflection is honest and has depth then we ask them to redo the presentation. We explain to them that this is not a "failure" this is a "not yet". Every student eventually passes but it takes refinement and time for some more than others.

We invite teachers, students, and family members to come see them because it provides a great opportunity to see a student in a different light than they may be used to seeing. It also gives a powerful opportunity to immerse themselves in our classroom/school culture. Since our entire school conducts POLs, we also ask our students to see POLs from the 10th, 11th, and 12th graders. This is an eye opening experience and they get to see the huge amount of growth and maturity that our students gain over 4 years.

How could you start implementing POLs in your classroom or school? Create an essential question of what you would like the students to reflect upon. Make it clear that this is not about grades necessarily  and that honesty is honored more than brown nosing (telling us what we want to hear). Then take 3-5 days depending on the schedule and listen to what your students have to say. It will definitely be worth your time. Invite others to come see the presentations and help ensure that this is taken seriously and given great importance.

Do not be lax or go easy on the students. Refinement requires honesty and growth will not come if you are not willing or able to say the things others might never have before. But also be open to hearing a new perspective on a student and perhaps insight into how you can better help that student and what they can do to help themselves.

Do you conduct Presentations of Learning? What criteria do you use to assess their learning? How has it impacted your students/school/community? Leave a comment and tell us how.

Subscribe to BrokenAirplane!

New Robotics 2011 Game Logomotion Released!

Do I seem more tired than usual? If so it is because the FIRST Robotics Competition had its Kickoff this Saturday and we have worked all weekend. If you are a subscriber or longtime follower of BrokenAirplane then you know how passionate I am about the power of Robotics to change a students life. In my opinion, robotics teams are the purest form of learning and allow students to unleash their creativity and potential while learning valuable STEM skills (Science, Technology, Engineering, and Mathematics).

Each year the game changes, and each one is always so unique and well designed that even after doing this for years, I still get as excited as my students to start designing (perhaps more so). This year's game is Logomotion and it celebrates the 20th year anniversary of FIRST Robotics. Watch the 3 minute video to find out what it is all about.


Pretty amazing huh? What is even more amazing is that thousands of teams are working right now to create their own unique designs. Completely led and run by students with feedback from mentors, just wait and see the incredible stuff students come up with.

Our team went to the San Diego Kickoff and had a blast. It is their Rookie FRC year and I am excited to share it with them. We are a relatively small team of about 8 students but thanks to the incredibly generous support of our sponsors NASA, JC Penny, our after school program, and private donations we are well equipped to handle the job. I am also incredibly grateful to the 3 engineers and 1 math teacher/programmer who have joined the Chaos Vortex team. 

I will provide updates on our progress as the season progresses. If you know a FRC mentor at your school, please give them a smile and an encouraging word as we tend to work an extra 20+ hours in addition to our regular teaching duties. We love every minute but after a couple of weeks it gets pretty exhausting.

Let me know if I or my team can do anything to support other teams. We are rookies but we have a few years of VEX under our belt and we love to help! We are always looking to start new teams and if you would like to come by and see our VEX or FRC team in action let us know so we can help get you going for next year.

6 weeks until ship date.

Subscribe to BrokenAirplane!

Share Math with Students and the World

If you have been playing with Geogebra learning the basics, sliders and animation, and hopefully some of your own, it won't be long before you want to share this with your students.

Of course you can show it on the projector if that is an option for you, but what happens when your students go home and need to remind themselves? Or perhaps you would like them to play with a concept before they come to class the next day. Whatever the reason, there is going to arise a need to share Geogebra files with your students outside the classroom.

Exporting a Worksheet
Luckily, Geogebra was built for easy sharing. Once you have created your Geogebra Worksheet that you want to share, click on "File" and then move your mouse over "Export". This brings up the sharing options.

There is the option to take a screenshot of your worksheet which can come in handy, but you probably want to share the whole thing, interactivity and all. Click on Export as "Dynamic Worksheet as Webpage (HTML).

From there add in your information to describe what the worksheet is about. I would recommend that you don't leave this section blank as I have seen many unlabeled worksheets that have made no sense at all. It is a great idea to add instructions and descriptions to make the worksheet as helpful as possible.

Don't be afraid to check out the advanced tab as well. These options allow you to restrict certain options like right-clicking, reseting the construction, hiding the tools, etc. This is not for the purposes of restriction but to ensure that the student only does what you want them to do. If you give too many options for a construction where you only want them to drag the sliders, they could get confused.

Finally, click "Export" and decide where to save the file and what it should be called and like magic, your Geogebra Worksheet is there all packaged into one HTML File. This makes it easy to email the file to your students. If you have a website, you can add this as a page by placing it in your website's folder and linking to it.

It used to be much more difficult to share Geogebra files on the web, but now it is all inside one self contained file. Keep in mind that if your computers have updated JAVA, the files can be used without access to the Internet. This came in handy one day when the network was down.

If you are going to embed the file into your blog or anywhere else, you can follow the directions on Kate Nowak's Blog but keep in mind that if you resize the file you are going to not shrink down the file but cut off some of it. That is why I usually will provide the actual file or link to the file by using the Geogebra Uploader.

Here is a link to the Quadratic Coefficients Exercise mentioned in the previous post on Sliders and Animation in Geogebra.

If you are interested in embedding the sketch into your blog, there are some excellent instructions on the Mathematics and Multimedia blog.

Community
Geogebra has been around for long enough that there are quite a few people using it. That is the power of Open Source, people who might not previously have been able to learn and contribute to this project can freely use it on any computer in the world. In fact the problem is almost too many resources.

Let the community support you right away in using Geogebra. What are you planning on teaching today? Trigonometric functions, quadratics, Derivatives, Addition? Type in _________ (your topic) geogebra worksheet and I would be shocked if you couldn't find something that you could immediately use in your classroom.

Here are some great resources that you can always rely on for great Geogebra Content:
Geogebra Wiki - The main site keeps a great collection of Worksheets that you can add to covering a wide variety of topics. There may be a Geogebra Institute in your area. Click the link to check it out. There is also a YouTube Channel dedicated to news and features in Geogebra.

Geogebra Math - Created by Linda (of Math247) and Maria (of Natural Math), legendary in the math community for their innovations and contributions. You will love these Worksheets.

Mathematics for Middle School - This is another blog where it is clear that the author (Andreas) is committed to creating great resources to share with educators and her students. The focus is on arithmetic and algebra which is so important as these abstract concepts demand visual explanation.

Mathematics and Multimedia - This blog will really take you deep into mathematics. The tutorials not only demonstrate topics but also proofs or concepts that cover a large span of topics. Guillermo has done a masterful job with this blog.

I will continue to do Geogebra tutorials and topics and if you have any ideas, suggestions, or questions about what you would like to see, let me know and I will either directly message you in the comments or Twitter or create a post to help you out. Remember to sign up for the CUE Conference in March and I will see you there!

Subscribe to BrokenAirplane!

Make Math Move with Sliders and Animation in Geogebra

It is incredible that within the first few hours of posting the Geogebra Basics post, hundreds had already checked it out via Twitter, Facebook, and the BrokenAirplane RSS feed. There are so many people who are interested in learning more about using Geogebra in their classrooms and I hope you are getting the hang of the basics and perhaps tried a few things of your own.
The next two features, are one of the most requested and often used features for Geogebra because they promote interactivity and understanding. Once you get the hang of it, your students will never look at an equation the same.

Sliders
This is one of my favorite features in Geogebra. Graphs/Functions show changes over a range of numbers, but what happens when you change the equation? These relationships are the core of the equations but students often miss it as they try to plot the graph.

Step 1: Open Geogebra (steps 1-3 in the basics post).
Step 2: Look at the bottom of the Geogebra window. On your left you will see the word "Input" and next to it is a text box to type in equations, variables, and more.


Step 3: Lets create some coefficients that we can play with. In the Input Bar, type in m=0 and hit "Enter" on your keyboard. It is important that you follow these instructions literally, so do not use an uppercase M (although you could use any letter in the future but for the example follow carefully)

After hitting "enter" you will notice under "Free Objects" a new object m which is set equal to zero.

Step 4: Create one more free object by typing "b=0" into the input bar and hit "enter".
Step 5: Next to the free objects "m" and "b" you will see a clear bubble. It is actually an ON/OFF switch for the slider. Click on the bubble for both of them and you should see a slider appear in the graphing window.


Step 6: Back in the input bar, type in "y=m*x+b" and hit enter. Note: The asterisk between the m and x is the multiplication symbol. You must type it this way as you will get an error if you try to just use "mx".
Step 7: It may have seemed like nothing happened, but in fact you just graphed y=mx+b, the equation of a line. The reason you can't see it is because you have your slope (m) set to zero and it is covered up by the x-axis.

So lets see that line and the power of sliders. If you look at the "m" slider, it says m=0. Click and drag the ball on the slider back and forth. Watch as the line changes its slope and imagine your students going "Ahhhhhhh" as you explain and show slope changing. The visual demonstration gives the student the mental connection they need to understand.

You can adjust the "b" slider as well and see the y-intercept change. Although it is called the "y-intercept" students still seem to get confused until you show them that its value determines where the line hits the axis and adjust it to show them how it can change.

As students begin to see these relationships, they can begin to apply their knowledge to new situations and visualize the graphs in their heads before they have to plot them by hand. Imagine a classroom where students and not calculators see the relationships between variables and coefficients.

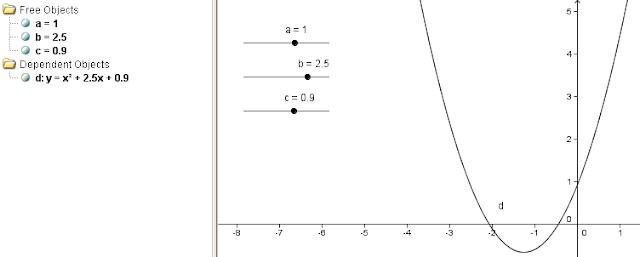
If you really want a fun demonstration, create three new sliders "a", "b", and "c" (step 3). Then enter in the equation y=(a*x^2)+b*x+c (the "^" symbol comes from holding shift and pushing the number "6") and you can show your students the relationship of the variables and coefficients in a quadratic. Seeing these numbers change,  become positive and negative, and zero really makes it all the clearer that math can represent real things like data and physics.


Changing the range of these sliders can be really useful and you can do this by right clicking on the slider ball and choosing object properties. Changing the interval will choose the range of numbers over which the slider will show. There are many other settings you can change in this menu like color and thickness, and much more. Be sure to try changing the size or color of your lines as well to make them easier to see from far away if you are showing this to a large group.

Animation
It can be very useful to have your students see the sliders move through all of the numbers over and over. This frees you up to walk around the room but also shows an animation of math moving which can be very beautiful and help promote understanding with trigonometric and polar functions.

To activate animation of a particular slider, right click the ball of the slider you wish to animate, and select "Animation On". By default it will cycle through all of the positive numbers and then go through the negative numbers over and over. You can change this in the slider's "object properties" menu and under the "slider" menu and "Animation" setting change the speed of the animation. The three options for an animation are: Oscillating, which is the default back and forth cycling through all of the numbers; and Increasing or Decreasing which will only once go through the positive or negative numbers. It might be necessary to slow down the speed so narration and explanation are possible.


Play around with those, and I do mean play. This is software that really encourages fun in math and I hope that these features will help your students to see that. In the next post, we take a more global look and see how to share Geogebra files with your students and the World! Also, there are an enormous amount of resources out there that I want to share with you from educators already making great stuff with Geogebra. See you next time.

Subscribe to BrokenAirplane!

7 Steps to Interactive Math with Geogebra: The Basics

It's the beginning of the year, and I am so glad I took the break from posting. It gave me a chance to read some great books, work on a few side projects which you will hear about soon enough, get the house finally in order, and spend some wonderful time with my family.

The FIRST Robotics Competition will begin this Saturday and I can't wait to tell you all about this years competition challenge.

Since I wasn't posting over the holidays I was not able to give you a present. So although it is belated, I wanted to share with you one of my favorite pieces of free and open source software, Geogebra (Geometry + Algebra). I remember seeing this software for the first time years ago and seeing the potential for Educational Technology. In fact, I will be speaking at the 2011 CUE conference in Palm Springs this year entitled "Geogebra for Interactive Mathematics".

Should you start using Geogebra? Well tell me if you have experienced this:
  • Difficulty graphing on the Whiteboard because of time or quality of drawing skills.
  • Confusion with your students about the relationships of variables and their coefficients (e.g. what happens when "m" or "b" changes in y=mx+b).
  • Students forgetting a long proof or steps to solve an equation.
  • And all of the other frustrations that come with the limits of reality to explain abstract concepts.
If you nodded your head to any of the above, then you need Geogebra. Don't worry though, it is free and easy to get started.

Getting Started With Geogebra

Step 1: Go to www.geogebra.org and click download.

  • UPDATE: Since this post was written, there is now a Geogebra for Elementary students. It is the same functionality but with bigger fonts and an easier user interface. 
Step 2: You have 3 options for using Geogebra to accommodate as many possible situations as possible.
  • Webstart - This is the option to choose if you want to be able to use Geogebra offline. It requires you to install the software and so make sure you talk with your school's IT department about getting this setup. Good option if you can get it just in case the web is down.
  • Applet Start - Allows you to use Geogebra fully in your web browser as long as you are connected to the web.
  • Offline Install - Use this option to download a Geogebra installer and share with a student if they do not have Internet access.
Most of the time you will use the Applet Start. This requires up to date Java which most classrooms have if the IT department works on them at least once a year.

Step 3: Open Geogebra. It will look the same no matter how you open it and on which computer, which is a beautiful thing when you are working with students.

Let's look at the construction tools that you will use most often. These tools are used together with others to make objects and manipulate them.


These buttons also store additional tools. I will describe each button and the additional tools in that menu. To see the additional tools, just click on the little arrow in the lower right of each button.


From left to right, you will find:
  1. Move, Rotate, Record to Spreadsheet
  2. New Point, Intersect two objects, Midpoint or Center
  3. Lines, Segments, Vectors, and Ray Tools
  4. Perpendicular, Parallel, Tangent, Best Fit
  5. Draw Polygon, or Regular Polygon
  6. Circle Tools
  7. Ellipse, Hyperbola, Parabola
  8. Angle, Distance, Area, and Slope
  9. Reflections and Translations
  10. Sliders, Text, Images
  11. Move, Zoom, Show/Hide
A lot of features, and it could seem overwhelming at first. But like any powerful software like Audacity or Inkscape, it is important to play around and get the basics and over time you will grow deeper in your understanding. Most important is that you believe in yourself and your ability to do this! I promise.

Step 4:Lets play around a bit to get the hang of the interface. Geogebra opens up with a nice graph all ready for you so lets add some dots. Click on the New Point Button and then click anywhere on the graph.

You'll notice that a new point has been created and labeled "A". This is also reflected on the left under "Free Objects". This means that you can change or move the point if you want.

Now create another point anywhere you want. A new point labeled "B" is created and the coordinates for both A and B are shown on the left-hand side.

Step 5: Lets turn those points into a line. Click the appropriately named "Line through Two Points" button on the right of the new point button. Then click on Point A and then Point B on the graph. A new line is formed labeled "a" (lowercase to differentiate it from points and you can change all of the names to whatever you would like later).

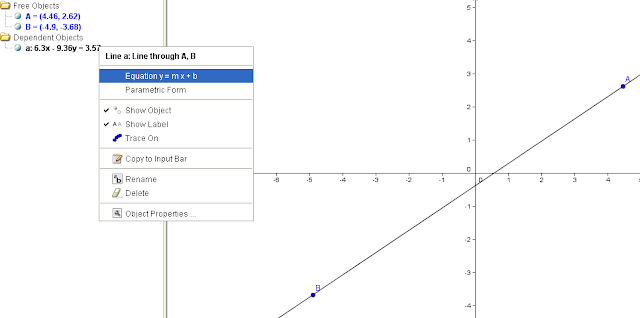
If you did the previous steps correctly, you should also see the equation for your line under dependent objects (because it depends on Point A and B). It defaults to standard form (Ax + By = C) but you can change that to slope intercept form by right clicking on the line and choosing y=mx+b. You can see this in the picture below but remember that our points and lines are going to differ so my numbers are not the same as yours.


You are probably ecstatic over how much clearer and precise your math demonstrations can be. Let me show you a couple more things today and next time we will go a bit more advanced.

Step 6: Lets make a perpendicular line. Click the next button to the right called "Perpendicular Line". It asks you to click on a point and a line, so click on either Point A, Point B, or create a Point C with the add a new point button from step 4. Then click on Line A.

Your perpendicular line has been created. If you would like to "undo" a step, click Ctrl+Z or choose it from the Edit Menu, but followers of this blog know the power of using Keyboard Shortcuts.


You may need to shift or zoom out, and you can easily do so by clicking on the "Move Graphics View" button. Just make sure you click the "Move" button (the furthest left) in order to click on objects again.


Step 7: As amazing as Geogebra is, you might ask yourself why my CUE Conference demonstration refers to using Geogebra to make "Interactive Mathematics". Well, usually once you have printed out a worksheet or drawn something on the board, it is done and it is difficult if not impossible to play around with it. There are expensive SMART boards that can create Interactive Math but you can do it for free with a computer and Geogebra.

Making sure the "Move" button on the far left is selected, select, hold, and drag Point A. You should see the entire line and it's perpendicular line shift around as well as the equations and points on the left. Check out the video below to see Geogebra in action.


Pretty amazing huh? Math does not have to be dead, now students can play with it, and play they will. Let them loose on Geogebra and they will create amazing art, drawings, and constructions in no time.

In the next couple of posts, I will show you even more amazing things in Geogebra. We should be able to cover:
  • Sliders and Animation
  • Embedding and Sharing Geogebra files with your students and the World
  • And some great resources from other Educators that you can immediately start using in your classroom.
If I could enlist in your help, I want to ensure that the CUE conference and these posts are helpful and relevant to you. If you have a suggestion for a Geogebra topic (or any topic in general) please leave it in the comments, send me an Email, comment on Facebook, or tweet me @BrokenAirplane. Thanks!

Subscribe to BrokenAirplane!