How to use Google Apps to Level the Playing Field
Gmail, Labels, Chat
Google Documents
Google Calendar
Google Sites
Google Sites - The Five Essentials to Getting Your Site Up and Running
Google Forms For Online, Easy, and Free Data Collection
The views expressed here do not necessarily represent those of my employer.
Showing posts with label google sites. Show all posts
Showing posts with label google sites. Show all posts
Google Apps Tutorial Part 5 Google Sites
Here we are. The final Google Apps series post, yet last does not mean least. Google Sites is going to allow you and your students to share with the world what happens in the classroom.
To find this app, you will need to go to the top of your browser screen in Gmail where it says "Gmail, Calendar, Documents", etc. Click on the "more" button and then on "sites". From there you can add pages, links, pictures, and more. Most importantly, once you have put up your site and told your students about it, the information is there 24/7/365. Your students and parents can always know what they need to know, have worksheets and files, etc. which takes a huge load off your back (no more blank faces when students come back from an absence, no more having to reprint papers for students who lost them, and the list goes on).
You can go to the Google App Training link in the previous post to learn more in depth, or just click around the app. If you have ever used a word processor or Google Docs, then the website editor is very much the same and you will be able to pick up the basics pretty quickly. It is known as a WYSIWIG editor (What You See is What You Get) which means anything you type or add into the page is going to look exactly the same on the site.
So if you have never made a website before, you might feel a bit overwhelmed. However, I know from helping hundreds of students and adults make websites that it requires just some trial and error and messing around for a couple of hours, especially with Google Sites. It will take some refinement and it is ok if you website does not look perfect initially. You can always go back and change something or start over so the important thing is to just plunge in and start creating your site.
If you want more than just a bare bones Google Sites you can add some flair and flavor using the design templates. You can make as many sites as you like for all of the different needs you will find in your class.
One of the most helpful things about Google Sites (which is true for any the other Google Apps) is that unlike other website editors you can work on your website from anywhere with a Internet Browser and Connection. This is why so many people are making their personal and professional sites using Google Sites.
So when (and why) might you want to make a Google Site?
Teachers:
- Post classwork and assignments
- Collaborate on a wiki with students or colleagues
- Share pictures of class events, projects, etc.
- Share important links, dates (by inserting you calendar), video tutorials (check out the next post)
Students:
- Your students can do everything you can do, but the main reason they will want to create a Google Site is to create a record of work for Universities, or potential Employers. Rather than having to keep track of everything they can upload it and then send the website link or download it all to a cd.
So I hope you and your students will create a Google Site and share all of the amazing things happening in your classroom with the world! If you need any more in depth coverage of a Google App, have a question, or a suggestion for a use for a Google App, please leave a comment in the posts.
You will certainly want to check out the next post as it has doubled the amount of time I have in the classroom and drastically reduced the number of times I need to repeat myself. Additionally, it helps your parents to be more supportive of your classroom and their student. What is it? It's Video Tutorials that you can create in under an hour! Stay tuned...
Google Site Tutorial - The 5 Essentials
There is no better way to share your information with your students and the world than with a website. There are many options but by far the easiest way is to use Google Sites. Plus it is free if you have a Google account.
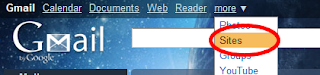 To find Sites, it is in the upper left with all of your other apps like Calendar and Docs. If you are not using Google Apps for schools and have just signed up for an individual account then you will need to click the more button.


I resisted making my classroom website on Sites for a while as I have created websites for over ten years with HTML using programs like Notepad, Frontpage, and Dreamweaver. But, after some new updates to the Google Sites interface, I am more than happy to use it.
Before we proceed there are some pros and cons to using Google Sites where it might be better to use a HTML editor.
When you need to use a CSS template, customized code, or host from your own domain, then you will want to use a program like Dreamweaver. (If you would like a free and open source alternative to Dreamweaver, I recommend Kompozer).
If however, you need the ability to manage your website from any computer and want one that is relatively easy to set up then Google Sites is your best choice.
 To find Sites, it is in the upper left with all of your other apps like Calendar and Docs. If you are not using Google Apps for schools and have just signed up for an individual account then you will need to click the more button.
Click create a new site and follow the instructions then click create site.
While there are certainly more ins and outs to it, many of us just want a good looking website that can share information. If that is you, then here are your 5 essentials for creating a Google Site.
Essential #1 Creating an Editing a Page
Now that you have created a "site" you need to create the individual pages that make up that site. In the upper left you should see a button that says Create Page.

There are 4 different types of pages and while some may be useful to you, the majority of sites are made up of Web Pages so make sure that is what is selected.
Name the page, make it something useful and easy to remember like "Syllabus" or "Links".
Below that you can decide where the page should reside. Think of your site as a tree branching out from its trunk. The trunk is the Home Page. This is your main page where people will first come to.
- Top level: This will place the page at the same level as your Home Page.
- The next option is to place the page under another page. For example I have a project page on the Top level and then the individual projects are on separate pages under the Projects page.
- You also have the option of choosing another location to put the pages under.
Keep in mind that all of the pages can link to each other regardless of how your organize your pages. How you organize your site is up to you and can be changed later.
Now you can edit the page you just created.

You will find it is similar to WYSIWIG (What You See Is What You Get) Editing in Dreamweaver, it is also similar to writing in Google Docs. One of the biggest updates to Google Sites was the large number of new items you can now insert into your page.

Use this space to insert pictures, links to other websites or pages, Google Calendars, Google Docs, video, or simply text. Whatever you labeled this page to be (e.g. Biography, Essays, Links) this is the place to put it. Take a look at the other options like Format, Table, and Layout for more options to customize this page.
Once you are done, click Save in the upper right of the page.
Congratulations, you have created your page and are ready for the next step.
Essential #2 Attachments
From the previous step, you are already aware of how to insert Google Documents, Calendars, Video, and the other options from the Insert menu when editing a page.
Note: If you use a Google Document, Presentation, or otherwise make sure you have the permissions set to share with everyone or those specifically you wish to.
If you have other types of attachments you wish to add to your website, it is quite simple. Once you have saved your page scroll to the bottom of it to where it says Attachments and Comments.

Click on the plus sign next to the word Attachments and then click on Upload. Choose the file you wish to upload to the page and click Open.
Continue this process for all of the attachments for that page and you are done.
Essential #3 Maintaining Your Website
Once you have created a few pages and uploaded a few files, you have a website. It is now about maintaining your site with updates, adding, and deleting.
Click on More Actions to access a few different options.

Some of the more important options are:
- Subscribe to Page Settings: If you are not the only one who will be editing the page (group project, grant proposal) then you will receive an email whenever the page is changed.
- Page Settings: Allows you to change the name of the page and change permissions.
- Move page: If you would like to change the hierarchy of your site.
- Save a page template: This will make this page the default page and all subsequent pages will look the same.
- Subscribe to site changes: Same as page subscription but for the entire site.
- Manage Site: Contains more options which we will review next.
- Share this site: This will send an email to those you wish to directly inform about your site.
Essential #4 Creating a Site Layout, Navigation, Sidebar, and more
You have created beautiful pages but unless they are linked together, no one will be able to find them. Additionally, there are other items of information you might always want to show your visitors (e.g. email address, links to important sites).
Click on the More Actions button and then on the Manage Site button on the drop down menu. The choices of greatest importance are:

- Attachments: Change, move, delete, or rename your uploaded files.
- General Site Settings: Useful to add your personalization.
- Sharing: Modify the settings on who can view your website.
- Site Appearance is where all of the personalization of how your site looks occurs.
Site Layout: Here is where you can fine tune the site. It is also where the sidebar can be found. The sidebar should look like the picture on the right. From here, click on Add a sidebar item found at the bottom of the sidebar. The two most important are:
- Navigation: This is how your viewers will navigate through the site. Click edit to reorder the pages.
- Text: Write a bio, an email address, or even insert HTML code for widgets like those found on social networking sites.
- Google has a great tutorial on making the most of your sidebar.
Essential #5 Colors and Fonts, Themes
This last section is the most subjective and will require your personal design choices.
The last two options on the Site Appearance section will allow you to select fonts, link colors, themes, etc. I would suggest you avoid immediately choosing your favorite color and think about the purpose of the site. How a professional site looks will be completely different to one of family members sharing pictures and stories.
Once you get the hang of these 5 essentials. You will have a great looking site where you can share information with the world. As a last note, go to your site and click on all of the links to make sure they work, check every page and get someone else's opinion about your choice of theme, colors, design and otherwise.
If you have any questions, comments, or feedback. Leave it in the comments or send me a message by email (phil at brokenairplane.com) or twitter (brokenairplane).
This tutorial was the result of a request so you can be confident that BrokenAirplane.com is committed to helping you use technology in the classroom and in the 21st century. New topics and tutorial suggestions are always appreciated.
Creating Video Tutorials for your Class Part 2
Video tutorials are an incredible technology, but like any technology their power is only manifested in how they are used. I can only offer my own suggestions because every environment is different and like anything else you will need to adapt video tutorials to your needs and your students' resources.
Now you have shared your videos with your classroom (and the world)! So what will you do with your extra class time? I would stress how important it is to still have that dialog with your students about the content where you can answer questions and clarification. However, now your students have had a day or so to process the information and they will have more questions and perhaps you can go more in depth than you previously could have.
After you have created your videos, you have a few options depending on your school's IT policy and your student populations' access to technology:
- Upload the videos to YouTube. This is best if your students have wide access to YouTube either through phones, home or school use. This will prevent you from having to convert the videos or have a place to host them.
- Share the videos through a Google site. Assuming this is your class site, you can add notes and other information to help your students.
- Email the videos or place them on a cd/flash drive. If you wish to do this then I would encourage you to convert them to a smaller file type like an FLV. The software I recommend for doing this is WinFF as it is free and versatile. I will do a more in depth tutorial on WinFF in the next post but for now all you need to know for now is:
- Install and then open WinFF
- Click "Add"
- Click on the "Convert to " drop-down menu and choose "Websites"
- Then on the "device preset" drop-down menu choose "FLV for fullscreen"
- Note the output folder and change it if you would like.
- Click convert
- If your students do not have the option to watch video readily available on their own, you might need to make computers available before/after school or lunch. If there are a lot of students who need this perhaps having it play on the projector at lunch.
In any case depending on how many videos you have for your students and the pace of your curriculum, I would stress how important it is to give your students a couple of days to watch it in case they need accommodations like choices 3 or 4.
Now you have shared your videos with your classroom (and the world)! So what will you do with your extra class time? I would stress how important it is to still have that dialog with your students about the content where you can answer questions and clarification. However, now your students have had a day or so to process the information and they will have more questions and perhaps you can go more in depth than you previously could have.
This is also a wonderful opportunity for you to introduce multiple learning styles into your classroom. With so much to cover this was always a struggle, but now think of all of the projects, labs, debates, plays, hands-on-activities, etc you can go through with the students (they could even make their own creative videos!). So often I never truly understood a concept until I was able to kinesthetically interact with it so I encourage you to be creative in all of the different ways you can cover a concept.
Please don't just continue on with the curriculum or try and cover more. One of the biggest criticisms of American Education is that it is a mile long and an inch deep. Your students need more than a day to develop an interest and understanding of the content. I always keep a chart of Bloom's taxonomy to help me determine how I should plan my lessons so that they increase in their depth of understanding as the week/month progresses.
Most importantly, we are liberated from lectures. While we still need to produce the video, it can be played over and over again and will allow us the freedom to spend more time going in depth with our students.
Did you become a teacher so you could mindlessly talk for hours about the information that could be just as easily obtained from a textbook or website? Or did you do it because of your passion for the content and the magical moments with students, helping them understand and develop interest.
Did you become a teacher so you could mindlessly talk for hours about the information that could be just as easily obtained from a textbook or website? Or did you do it because of your passion for the content and the magical moments with students, helping them understand and develop interest.
You are free to be the teacher you always wanted to be, this is technology properly utilized.
If you have any questions, concerns, suggestions, tips, please leave a comment.
Thanks as always for reading!
 Labels:
bloom's taxonomy
,
content
,
free
,
google sites
,
howard gardner
,
lecture
,
multiple intelligences
,
technology
,
video tutorials
,
winff
,
YouTube
Labels:
bloom's taxonomy
,
content
,
free
,
google sites
,
howard gardner
,
lecture
,
multiple intelligences
,
technology
,
video tutorials
,
winff
,
YouTube
Subscribe to:
Posts
(
Atom
)