Showing posts with label video tutorials. Show all posts

Blender 3D Modeling Resources for Education

Subscribe to BrokenAirplane!

When I show Blender to educators, they immediately say show me how you do that so I can use that in my classroom!

When they see Blender's interface for the first time they want to run away. It is overwhelming but once you spend an afternoon with it you discover that it isn't confusing, its powerful and packed with features.


For those of you who have never heard of or used Blender, it is 3D rendering software allowing you to create models for video games, CAD printing, and now a movie! It was the technology behind the OVRP Virtual Bike and did I mention it is Free and Open Source?

I agree it has a learning curve but for many, this is an opportunity to learn a software that is highly applicable to their future career without costing them the thousands for a proprietary software like Maya.

Blender is the perfect software to prove what Patrick and I say about learning technology because you as the teacher have little if any experience with it.

We cannot wait until we are masters or pros to use a technology with the students. There are too many and it would take too long. You should not let that stop you from using it. Show it to your students and they will learn more than you ever thought possible. While the following are not all of the resources out there, these are the ones my students and I have used with success. That is the great thing about the Blender community, there are so many choices out there.

Video Tutorials:
HamsterHill - These are the tutorials that my students started using to learn Blender and they are great, his accent occasionally trips you up but they are easy to follow nonetheless.
IraKrakow -  For more advanced topics these were very helpful.
BlenderUnderground - Very well made and high quality. If you are looking to become a master of Blender, these would be a great first step towards professional level knowledge.
Tutorials for Blender 3D - If you are creating a video game or movie with Blender, these tutorials are for you. logic blocks, textures, and the Blender Game Engine are all covered well in here.
Blender Cookie - Excellent suggestion from Black Stormy covering a wide variety of concepts from start to finish as well as those concepts beyond modeling (particles/physics/lighting/etc)

Text Based Tutorials:
Blender 3D: Noob to Pro - An incredibly well done community generated wiki that will take you through all of the essentials. Patrick and I were at a conference together and spent much of our time working through the exercises in this book. It prepared us to make the Virtual Bike tour and Patrick's class' 3D movies. Go step by step or reference it (and yes I know it's spelled n00b, I'm just copying the website).

Keyboard Shortcuts - This is ESSENTIAL! There are so many commands and features possible and you will waste a lot of time trying to find them in the menus. After using Blender for a while you will remember them as well as the other Windows/Mac keyboard shortcuts you should be using.

I'll continue to add to this list as I come across them as I do with my Android, Free Software, Humanities, Math Science, Geogebra, and Programming Resources lists.

Subscribe to BrokenAirplane!

Creating Video Tutorials for Your Classroom Version 2.0

Subscribe to BrokenAirplane!

Video tutorials are a tool with the power to do a lot of good for learning. I have believed this for quite sometime in fact it was one of the first posts on BrokenAirplane. There are three main obstacles to overcome in this area and they are: Access to technology and videos, pedagogy and usage of video tutorials in your classroom, and high quality creation of video tutorials.

The first one is quickly diminishing as smartphones become more and more ubiquitous, many more students around the world have a phone rather than a computer. The issue of pedagogy is arising as an issue as some schools are adopting video tutorials or technology based lessons as a replacement for the teacher. Others feel that the video tutorial is not effective at delivering content.

I believe that video tutorials have a time and a place. In Patrick and my experience, they are most effective when they are used for a specific skill or concept as opposed to curriculum. This keeps the video focused and allows students to focus on a concept. When it is something "fuzzy" like Inertia or Gravity (as proven by the Veritasium videos/research) it is difficult to convey it through a video, there are better ways of ensuring that these concepts are understood and that they stick. Video tutorials best work in situations where it is a new skill and has multiple steps.

It is my belief that we are stronger when we work together as a global community of learners and educators. Each of us must have at least one amazing thing that is worth sharing with the world and video tutorials allow us to share all of those wonderful talents with each other and our students. So Patrick and I have worked much this year to refine our instructions on how to make video tutorials. In that time we have discovered some really cool things both technologically and pedagogically and we wanted to share them with you. I hope you will share this around your school, share with us what you are doing with the technology, and provide any feedback to ensure that this is helpful to as many people as possible.

Here is a link to the original PDF for the Video Tutorials.

Subscribe to BrokenAirplane for all of the relevant technology and education news/information. 

SAM Animation is the Standard for What Educational Software Could Be

A couple of months ago, I was contacted by our organization's COO about SAM Animation software. He was really excited about it and at first I'll admit I didn't see the point. That was until I downloaded and tried out the software. I have not seen anything else that makes it so easy for students and teachers alike to create movies and animation to demonstrate learning.

This is a really high quality piece of software, that has been rigorously tested and refined in the classroom. It began a few years ago at Tufts University funded by the National Science Foundation. The software was released to the public and quickly gained a following of tens of thousands. Try out the free download by going to SAM Animation and clicking on the "Download Demo" button. The demo will let you see all of the amazing features and I am sure you will see how powerful this software can be.


SAM Animation software can be used to create stop motion or time lapse movies. 

Stop motion is where you take a picture, move the object, take another picture, and so on. This is how animation was originally done with films like Snow White and it is still how claymation movies like Wallace and Gromit or the Nightmare Before Christmas are made. With this, your students can create instructional videos using a variety of props and tools. Students of all ages love making movies, and there are many examples on the SAM website (some by Kindergarden children). For example check out this Life Cycle of a Tree video. Students are creating videos about science, math, history, the arts, and more.

Here is my former robotics team having some fun with this year's FRC Game Pieces


Time lapse movies are equally amazing to create and watch. A time lapse movie is used when you have something you want to capture but it takes a long time. For example, a sunrise/sunset, the sprouting of a seed, the solving of a Rubik's Cube, building of a robot, etc. This is the type of technology used for many parts of the award winning series Planet Earth. 

You might think to yourself that this sounds way too complicated, but within 5-10 minutes (I promise) of installing the demo you will have figured out the main idea and can start recording right away. You will need a webcam (every one we have tried so far has worked) and the installed demo.

After creating a project you will come to the stop motion page.Where capturing action is just a click away. There are two great features that you will discover right away. First, each picture that you take shows up in a timeline on the bottom and can easily be deleted with a single button.


The second main feature, and my favorite, is called Onion Skinning. You can see this in the window on the right. SAM Animation will show you in a ghost-like form where your last picture was taken so you can make sure you are positioned correctly for the next shot. This is perfect to make sure distances are realistic as well as being able to pickup where you left off when class ends.

Double clicking on a frame will bring up the editing window where you can draw, type, and even Chroma Key which is the professional term for replacing a background with another image. This allows your students to create a video in space, underwater, or anywhere else.


Recording audio is a snap, and a joy as you can record afterwards or import sound into the animation. 

If you would like to create a time lapse animation, simply click on that tab and you are presented with options for how often each picture is taken and for how long you want it to continue to snap the shots.


There are a many more features but if I don't have you convinced yet, here is the best reason why your classes will love using SAM Animation software. If you have used Adobe Premier or another expensive video software, then you know about the time lost to rendering or crashing while saving. With SAM, you click on File and then Export, and up pops a host of options like Flash, Quicktime, formatted for iPod, etc. that you can save to. Then for those of us who work on antiquated computers/networks, you can choose how fast your Internet speed is so the save is far less likely to crash your computer or slow down your network.

From speaking with Melissa, co-founder of iCreatetoEducate, every decision and feature has been driven by teacher and classroom feedback. From how easy it is to use, to the consideration of varying needs and technology, this software is a shining example of what educational software can be when there is passion and a love of learning driving it.

If you are interested in giving your students an innovative and exciting way to learn and share their learning with the world, then check out SAM Animation for the free demo and examples. I also suggest the iCreatetoEducate site where you can find support for SAM and suggested camera and props to help make your animations, and some great examples and tutorials. You will find the service and support to be excellent and product will continue to wow you every time you use it.

Subscribe to BrokenAirplane for all of the best in educational resources like SAM Animation.

Learn Modern Electronics with Arduino

How much do you know about electronics? I am not talking about using your Android phone or your Wii, I mean how much do you know about making electronics? Chances are not much. Most textbooks have very little about the subject, including Ohm's law and maybe some DC Circuits but with most Physics teachers strained to get through all of Newton's Physics it is difficult to spend more than a week or two at best on the topic.

Yet, do we see catapults and inclined planes prominent in our society? No, but everyone wants the phone with the most transistors. Will your students know a thing about electronics? Lightbulbs and switches are a great start but anything invented after 1980 has a brain inside it and is more complex than a battery and some wire.

I would love to see a spring cleaning of the physics standards in this country. Most of us are taught, and subsequently teach a physics curriculum centered around ancient to renaissance discoveries/inventions. I know it takes a while for education to catch up to society but 500 years? If we are to help students innovate and become interested in STEM then we need to teach them relevent materials.

So what do I do with my students? If you follow my blog, you know I spend a lot of time helping them to create visual models of math and time learning how to program software. This year, through fundraising I am able to provide a new opportunity for my students to learn 21st century skills and science, physical computing.

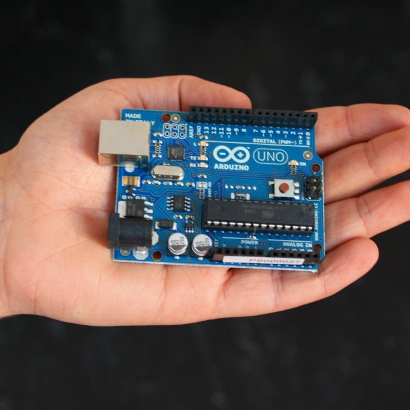
Physical computing, is the act of taking software and having it interact with the physical world. This can occur through sensors and data analysis, movement via motors, sound and light, etc. I love it because it blends heavily with my philosophy that math is art. Although there are many avenues by which one can explore physical computing, I have discovered the easiest and most enjoyable way for students and teachers is through the Arduino Microprocessor.

A microprocessor is the brain of any electronics and is vital to running todays applications and programs. A microprocessor for our computers or even the ones inside my robotics team's robots can run a couple hundred dollars. But the Arduino is Open Source Hardware/Software and eventually via economics and design reached a price of less than $30! This is about the price for a family of four and far cheaper than much of the education science equipment out there.

What can it do? It is cliche, but the better question is what can't it do. Depending on what you connect to it, you can light a led, take temperature readings of a chemical solution every minute, create a toy car driven by a Wii controller, sense changes in acceleration or light, and the list goes on. It is designed for learning but powerful enough to do pretty much anything you want.

I have created a few video tutorials using Patrick's newest video tutorial methods (which we are going to release soon). Here is the first two in which I teach you how to make the LED fade in and out (like a Macbook).

In order to do this you will need:

  1. Arduino - As of this writing, the newest was the "Uno" which you could purchase from Sparkfun or your favorite electronics supplier. Don't forget to download the software!
  2. LED - This is your basic LED that you can purchase from Radioshack or any where else (Sparkfun)
  3. A couple of pieces of wire (jumper cables, not the ones that go in your car)
  4. The A-B printer cable which connects your Arduino to the Computer
That's it enjoy the tutorials! Afterwards, I'll share some great resources for learning more about Arduino. (I recommend making them full screen so you can see the code and what is happening).

Part 1: Pulse Width Modulation (PWM)
Part 2: The LED and Arduino

There are great ways to learn more about Arduino:
  • The main Arduino Page has a lot of free books and resources as well as explanations for all of the built in examples.
  • The Arduino Cookbook is an essential resource for any one who is serious about Arduino.
  • Learn from the great Lady Ada (aka Limor Fried) Arduino, electronics and more.
  • Udemy has a good overview of the Arduino, its parts, and how to get started.
  • Another video about PWM via Make Magazine
  • The 2011 First Quarter Issue of Make Magazine is all about Arduino. If you don't get the free newsletter or subscribe, you really owe it to yourself to do so.
I hope you take advantage of the convergence of cheap software/hardware and a large volume of free resources. Your students and the future will thank you!

Subscribe to BrokenAirplane to get all of the news and resources delivered to you!

Introducing Computer Programming to High School Students Using Python

Add up all of the numbers from 1-100. 

There is a story that has been told in many different ways of a young man named Carl Gauss who was assigned, along with all of his fellow students to do the above task. Most of the tellings of this story portray the teacher as drunk, tired, or simply wanting to keep his students busy. Then after just a couple of minutes, Carl astonished everyone by raising his hand and announcing the answer.

The age of information did not take off because we could use computers to make pretty spreadsheets or documents, it was because we could now be superheroes. The ability to calculate at lightning fast speeds changed what humans were able to do forever. We could now go to the moon or perform bank transactions instantaneously. We were on the brink of utopia, there was talk that computers would cut the workweek down to 20 hours a week (why it in fact increased is for another post, another time). 

Computers are fast and if you can harness that power you can control the universe.

Gauss took a couple of minutes to discover that 1+100 = 101, 2+99 = 101, 3+98= 101, and so on creating 50 pairs of 101 and therefore the sum of the numbers from 1-100 was (50 x 101) = 5050. Ironically, a student could Google "Gauss 1-100 sum" then find, read, and understand in the same amount of time it took Gauss to do it from scratch. Isn't technology grand?

We can ask computers to do all kinds of things if we speak their language. In this case we will use the language Python.

If you have not downloaded it yet, here is the link: Python. I would encourage you to download version 2.7 as it is more widely compatible. 

You can open Python through IDLE or the Command Prompt, it will work either way.

Before we get to our Gauss problem, lets initiate ourselves into the world of programming.

Type in the following: print('Hello World') so the command line looks like:

print('Hello World')

When you press enter, you will see the response.

Hello World

Congratulations, you and the computer are now on speaking terms. The print function will output to the screen anything you put inside its parenthesis.

Try this:


print(3+5)

We are going to leap ahead to looping. This is where the computer truly excels, when you can ask the computer to do something over and over and over again with accuracy and speed.

Lets say you wanted the computer to say 'Math is fun' 5 times. 

for i in range(1,6):
...    print('Math is fun')

Make sure you don't forget the colon, and then hit enter. On the next line Python you will see 3 dots. This means that you wish to create a "for loop". Hit the spacebar to indent 4 spaces to indicate what will be looped.

Hit enter twice, once to break out of the loop and another to run the program. Python will run through the loop 5 times (the range 1,6 means 1,2,3,4,5 and stop at 6) printing Math is Fun.

Math is Fun
Math is Fun
Math is Fun
Math is Fun
Math is Fun

What you said was, "for every number in the range of 1-6, output to the screen Math is Fun". 

Finally, regarding our Gauss situation. Lets create a variable, which we know from math stores a number.

answer = 0

Type that and hit enter. Now you have told the computer to set aside some memory with the number zero in a place called 'sum'.

Let's create the loop which will go through the numbers 1-100 and add them to the sum.

for answer in range(1,101):
...       answer = answer + number

Hit enter twice, and you are done! In less than a second, the computer did what we could not have done in minutes or hours. 

Hey wait, I don't see anything. Ahh, while the computer is finished, it has not told you anything, but that was because you never asked.

Type in print(sum) and see what the answer to all of the numbers from 1-100. Did you get 5050? Awesome!

Modify the program to add up all of the numbers from 1-1000 or have it print out the result of 10! (Factorial - the product of the numbers, e.g. 1*2*3*4*5, don't do this for a large number or your computer will run out of memory and crash!)

This is one way of using programming to save you time. Consider all of those bank transactions that were at one time done by hand or librarians who manually would catalog and find books on a particular subject. What about calculating the shortest way around the traffic jam on the freeway. The possibilities are truly limitless.

I will continue to provide some more examples but as you get more and more acquainted with programming languages like Python you can use your own creativity to adapt to your needs and interests as I have. As programming tends to be a teach yourself kind of thing, you will need to find what tutorials work best for you. If you prefer books, Amazon and other book stores have plenty. The number of tutorials online are at least twice as much. Many of my students benefit from YouTube Videos from authors like thenewboston. 

Programming is an art, not just a science. If you are having problems installing, getting a program to work, hearing more of my recommendations for resources, helping you to create your own programs, or how to implement in the classroom; leave a comment or email me at phil@brokenairplane.com.

Additional Thoughts and Resources on Video Tutorials for the Classroom

So much information, it can't be contained in just a couple of posts. Here is one more idea:

Family Question:
If you have created your video tutorials, it is highly likely that your students are going to watch them at home. If that is the case then you have entered a sacred place to your students. This is where their tightest circle of trust, encouragement, and motivation comes from apart from their friends. Unfortunately, the classroom and the home all too often interact only when there is something wrong. There is no doubt that if a family is on board with  student's education, then the student will be more engaged and interested.

How do you do this? With the family question. Pose a fun interesting question tied to the content that the family can puzzle over. I am not referring to y=2x+4 per se but perhaps a puzzle or question that can provide good table conversation. Some examples are Exeter Academy Math Questions, Drexel Math Forum, Lateral Thinking Puzzles, for Humanities teachers there is NPR and TED Talks to spur on discussions/debates. I once gave an assignment asking students to start a book club at their home to take turns discussing their favorite book but you could also provide the articles for them to discuss.

Additional Resources:
  • Khan Academy this man has created great quality videos on almost every topic you can imagine. Humanities, math, science, he has it all.
  • MIT Open Courseware watch the videos, read the notes, check out the problems, be a part of the classes from the world renowned MIT.
  • Podcasts from Stanford
  • and of course, YouTube's special education site.

Student Video Tutorials

If you are curious whether or not your students will be interested in your video tutorials or if they would want to make their own, check out Hayden Parker a 17 year old who does Chemistry Lessons in his back yard and puts the videos up on YouTube.

Make Magazine Original Link
Hayden Parker's Chemistry Videos

And if you are interested in your own great and fun chemistry experiments that you can do in your backyard, basement, kitchen, this is a well written book that will take you step by step through labs amounting to a semester or two of high school chemistry.

Creating Video Tutorials for your Class Part 2

Video tutorials are an incredible technology, but like any technology their power is only manifested in how they are used. I can only offer my own suggestions because every environment is different and like anything else you will need to adapt video tutorials to your needs and your students' resources.

After you have created your videos, you have a few options depending on your school's IT policy and your student populations' access to technology:
  1. Upload the videos to YouTube. This is best if your students have wide access to YouTube either through phones, home or school use. This will prevent you from having to convert the videos or have a place to host them.

  2. Share the videos through a Google site. Assuming this is your class site, you can add notes and other information to help your students.
  3. Email the videos or place them on a cd/flash drive. If you wish to do this then I would encourage you to convert them to a smaller file type like an FLV. The software I recommend for doing this is WinFF as it is free and versatile. I will do a more in depth tutorial on WinFF in the next post but for now all you need to know for now is:
    1. Install and then open WinFF
    2. Click "Add"
    3. Click on the "Convert to " drop-down menu and choose "Websites"
    4. Then on the "device preset" drop-down menu choose "FLV for fullscreen"
    5. Note the output folder and change it if you would like.
    6. Click convert
  4. If your students do not have the option to watch video readily available on their own, you might need to make computers available before/after school or lunch. If there are a lot of students who need this perhaps having it play on the projector at lunch.
In any case depending on how many videos you have for your students and the pace of your curriculum, I would stress how important it is to give your students a couple of days to watch it in case they need accommodations like choices 3 or 4.

Now you have shared your videos with your classroom (and the world)! So what will you do with your extra class time? I would stress how important it is to still have that dialog with your students about the content where you can answer questions and clarification. However, now your students have had a day or so to process the information and they will have more questions and perhaps you can go more in depth than you previously could have.

This is also a wonderful opportunity for you to introduce multiple learning styles into your classroom. With so much to cover this was always a struggle, but now think of all of the projects, labs, debates, plays, hands-on-activities, etc you can go through with the students (they could even make their own creative videos!). So often I never truly understood a concept until I was able to kinesthetically interact with it so I encourage you to be creative in all of the different ways you can cover a concept.

Please don't just continue on with the curriculum or try and cover more. One of the biggest criticisms of American Education is that it is a mile long and an inch deep. Your students need more than a day to develop an interest and understanding of the content. I always keep a chart of Bloom's taxonomy to help me determine how I should plan my lessons so that they increase in their depth of understanding as the week/month progresses.

Most importantly, we are liberated from lectures. While we still need to produce the video, it can be played over and over again and will allow us the freedom to spend more time going in depth with our students. 


Did you become a teacher so you could mindlessly talk for hours about the information that could be just as easily obtained from a textbook or website? Or did you do it because of your passion for the content and the magical moments with students, helping them understand and develop interest.

You are free to be the teacher you always wanted to be, this is technology properly utilized.

If you have any questions, concerns, suggestions, tips, please leave a comment.

Thanks as always for reading!